
Silicone Soap Mold Combo: Round Flower + Rectangle Cavities for Home Soap Makers
The Azlok 6 Cavity Round Flower + 9 Cavity Rectangle Soap Mold combo is a two-mould silicone set for making handmade soaps at home, giving you decorative flower rounds (about 105–110 g each) and neat rectangular bars (about 130–150 g each) in a single batch. It is flexible, reusable and priced at ₹519 for the combo pack, making it a sensible starting point for beginners and small soap businesses alike.
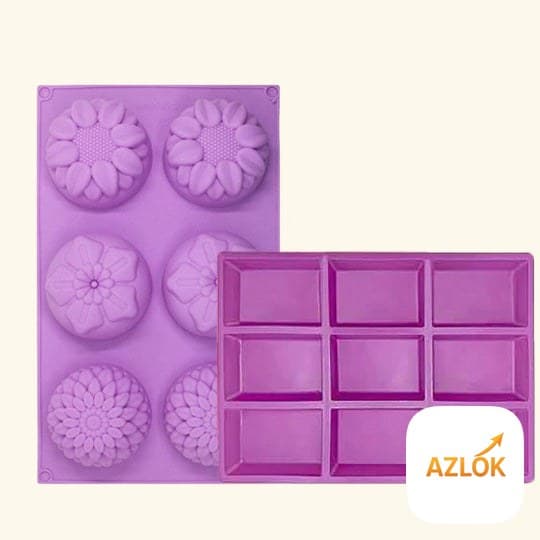
What you get in the combo
This is a practical pairing of two shapes that cover most everyday needs:
- 6 Cavity Round Flower Mould — approximately 17 × 25 cm overall, producing pretty floral rounds of roughly 105–110 g each. Good for gift soaps and guest bars.
- 9 Cavity Rectangle Mould — approximately 31 × 21 cm overall, giving classic rectangular bars of about 130–150 g each. Ideal for regular bath soaps.
Both moulds are made of food-grade style silicone, which flexes easily so cured soap pops out cleanly. Colour is dispatched as per stock availability, so you may receive any in-stock shade — this has no effect on the finished soap.
What you can make
Silicone moulds are versatile, so this set is not limited to soap:
- Melt-and-pour soap — the easiest method for beginners.
- Cold-process and hot-process soap — pour, insulate and allow to cure.
- Wax melts and small candles — the flower cavities look lovely as scented melts.
- Bath bombs and resin or plaster crafts — the flexible walls release detailed shapes well.
How to use the moulds
- Place the mould on a flat, rigid tray or board so it stays level and is easy to move.
- Prepare your soap base. For melt-and-pour, cut and melt gently in a double boiler or microwave in short bursts.
- Add your fragrance oil and colour once the base is slightly cooled, then stir well.
- Pour steadily into each cavity, filling almost to the top. Tap the tray lightly to release air bubbles.
- Let the soap set fully. Melt-and-pour firms up in a few hours; cold-process needs 24–48 hours before demoulding and several weeks to cure.
- To demould, gently pull the silicone edges away and push from the base. The bar should slide out without tearing.
Care, cleaning and storage
- Wash with warm water and mild dish soap after each use, then dry completely before storing.
- Store flat or loosely rolled, away from direct sunlight and sharp objects that could nick the silicone.
- Avoid cutting inside the mould with knives or blades — this damages the cavities.
- Do not expose to open flame or very high oven temperatures beyond the silicone's rated limit.
Safety notes for soap making
Handmade soap is rewarding, but a few precautions matter, especially with cold-process work:
- Lye (sodium hydroxide) is caustic. Always wear gloves and eye protection, work in a ventilated area, and add lye to water — never water to lye.
- Keep raw soap batter, fragrance oils and lye well away from children and pets.
- Patch-test any new soap on your skin before regular use, particularly if you have sensitive skin.
- Melted soap base and wax can burn — handle hot containers carefully.
Buying and value
At ₹519 for the combo, buying two mould shapes together works out more economical than purchasing them separately, and you can scale up with the 2 Combo Pack option if you make soap in larger batches. Azlok stocks these alongside its range of fragrance oils, essential oils and soap-making supplies, so you can put together a full kit in one go. The moulds are made in India and built for repeat use, which suits both weekend hobbyists and small home-based sellers.
FAQ
How much soap does each mould hold?
The 6 cavity flower mould gives bars of roughly 105–110 g each, and the 9 cavity rectangle mould gives bars of about 130–150 g each, depending on how full you pour and the density of your recipe.
Can I use these moulds for cold-process soap?
Yes. The silicone handles cold-process and hot-process soap well. Allow 24–48 hours before demoulding and cure the bars for several weeks so they harden fully.
Do I need to grease the mould before pouring?
Usually not. Silicone releases soap easily on its own. A very light spritz of release spray can help with sticky recipes, but for most melt-and-pour and cured soaps it is unnecessary.
Are these moulds safe for wax melts and candles?
Yes, they work for wax melts and small pillar-style pours within the silicone's normal temperature range. Never place silicone moulds directly over a flame or in a very hot oven.
What colour mould will I receive?
Colour is dispatched based on current stock, so you may receive any available shade. The mould colour does not affect the appearance or quality of your finished soap.