
Making a soy wax candle at home is genuinely simple: you melt the wax, stir in a fragrance oil and colour, secure a wick in a jar, pour, and let it set. The Azlok Soy Wax Candle Making Kit gathers everything a first-timer needs in one box, so you are not chasing supplies from five different shops before you begin.
What comes in the kit
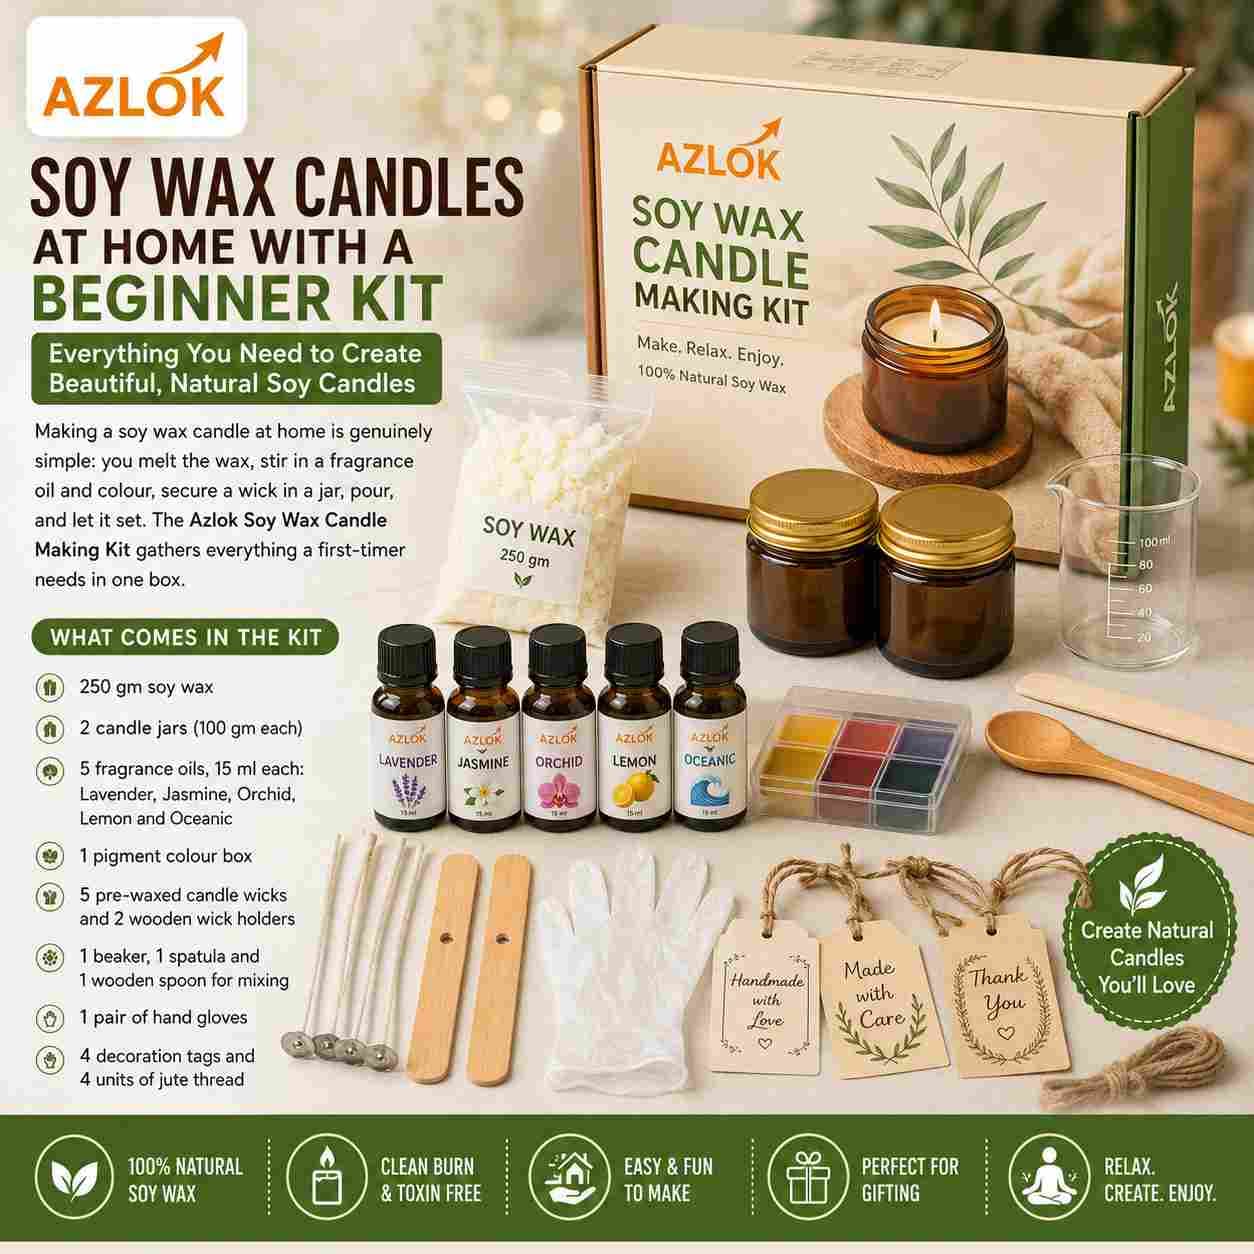
Each kit is put together for two small candles and a bit of practice room. Inside you will find:
- 250 gm soy wax
- 2 candle jars (100 gm each)
- 5 fragrance oils, 15 ml each: Lavender, Jasmine, Orchid, Lemon and Oceanic
- 1 pigment colour box
- 5 pre-waxed candle wicks and 2 wooden wick holders
- 1 beaker, 1 spatula and 1 wooden spoon for mixing
- 1 pair of hand gloves
- 4 decoration tags and 4 units of jute thread
The variety of fragrance oils is the fun part. You can keep your first two candles simple, then experiment with blends once you get the hang of it.
How to make your candle, step by step
- Set up. Cover your table, wear the gloves and keep your jars, wicks and holders ready before you start heating anything.
- Fix the wick. Place a pre-waxed wick at the centre of each jar and rest it in the wooden wick holder so it stays upright and centred.
- Melt the wax. Use a double-boiler method: place the soy wax in the beaker and set the beaker in a pan of hot water. Stir gently with the wooden spoon until fully melted. Soy wax melts at a low temperature, so avoid direct high heat.
- Add colour. Take a small amount of pigment from the colour box and stir it through until even. Start light; you can always add more.
- Add fragrance. Once the wax is off the heat and slightly cooled, stir in your chosen fragrance oil. A few millilitres per candle is plenty. Mix thoroughly with the spatula.
- Pour. Slowly pour the wax into the jar, keeping the wick centred. Leave a little space at the top.
- Set and trim. Let the candle cool undisturbed for several hours until firm. Trim the wick to about 5 mm before lighting. Finish with a jute-tied decoration tag if you are gifting it.
Tips for a better burn
- Let the candle cure for a day or two before the first burn so the fragrance settles.
- On the first light, let the wax melt all the way to the edges of the jar. This prevents tunnelling and gives an even burn later.
- Keep the wick trimmed each time to reduce smoke and soot.
- Add fragrance when the wax has cooled a little, not while it is very hot, so the scent does not burn off.
Safety notes worth remembering
Molten wax and hot water can burn, so work carefully and keep children and pets away from your workspace. Fragrance oils are for scenting candles only, not for eating or applying directly to skin, and it is sensible to work in a ventilated room. Never leave a burning candle unattended, and place lit candles on a heat-safe surface away from curtains and other flammables.
Buying and storage tips
The kit is available in Pack of 1 (currently a Today Deal), 2, 5, 10 and 50, so you can start small or buy in bulk for a workshop, a class or a small candle business. Store leftover wax and fragrance oils in a cool, dry place away from direct sunlight, and keep the bottles tightly capped so the oils do not weaken. Azlok also stocks wax, wicks and fragrance oils separately, which is handy once you run out and want to scale up your favourite recipes.
FAQ
Is soy wax good for beginners?
Yes. Soy wax melts at a low temperature, pours cleanly and is forgiving to work with, which makes it one of the easiest waxes for a first candle.
How many candles can I make with one kit?
The kit includes two 100 gm jars and 250 gm of wax, so you can comfortably make two candles with a little wax to spare for practice.
Do I need any extra equipment?
Mainly a pan for the water bath and a heat source. The beaker, spoon, spatula, gloves, wicks and holders are already in the kit.
How long should a candle set before burning?
Let it cool for several hours until fully firm, and ideally cure for a day or two so the fragrance develops before the first light.
Can I mix the fragrance oils?
You can. Once you are comfortable, try small blends, such as Lemon with Oceanic, but add a little at a time and note your quantities so you can repeat a good result.